 Save
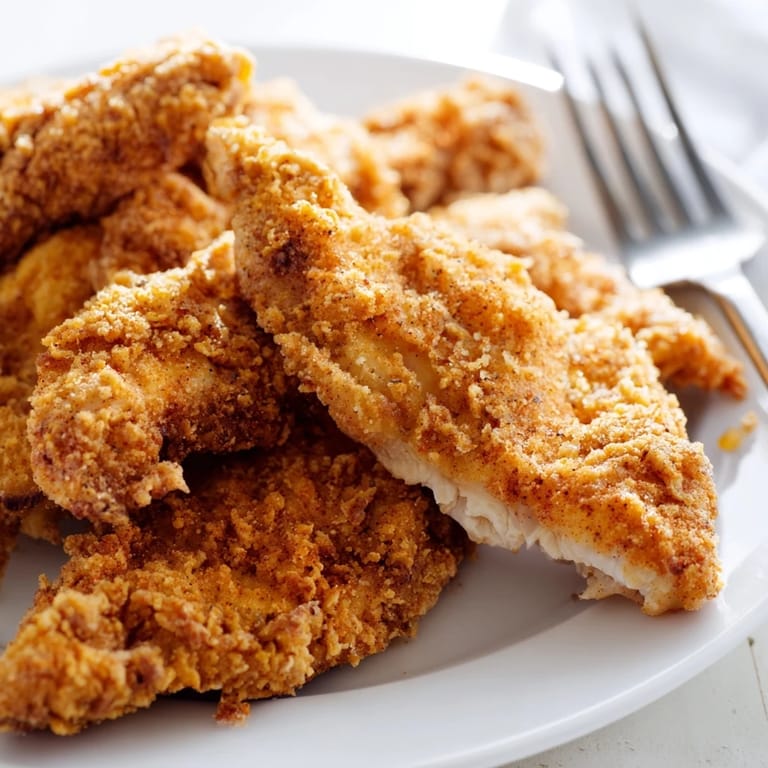
Save The sound of hot oil popping and sizzling takes me back to Tuesday nights at our house, when my kids would hover around the kitchen like hungry birds. I started making these buttermilk chicken tenders after a potluck where they disappeared in minutes. The secret is that buttermilk bath that breaks down the proteins, creating that impossibly juicy interior beneath a golden, shattering crust. Even now, the smell of paprika and hot oil still signals it's about to be a good night.
Last summer during a backyard gathering, I brought out a platter of these golden tenders and watched my brother-in-law, who claims to be a chicken tender connoisseur, take his first bite. His eyebrows shot up, and he mumbled something about restaurant quality while reaching for seconds. The kids abandoned the pool to come running, leaving wet footprints across the patio, hands outstretched for their share. Something about homemade tenders brings out the kid in everyone, no matter how sophisticated their usual taste.
Ingredients
- Buttermilk: Not just for moisture but the acidity actually breaks down proteins in the chicken, creating that restaurant-level tenderness that keeps people coming back.
- Baking Powder: This unsung hero creates tiny bubbles in the coating as it fries, giving you extra crunch without having to double-dip.
- Chicken Tenders: Using actual tenders rather than cut breast meat gives you that perfect strip of tenderloin that stays juicier and has a better texture.
- Paprika: Beyond color, it adds a subtle sweetness that balances the savory elements and makes the coating more complex than just salt and pepper.
- Cayenne Pepper: Even just a little wakes up all the other flavors without making it spicy for heat-sensitive eaters.
Tired of Takeout? 🥡
Get 10 meals you can make faster than delivery arrives. Seriously.
One email. No spam. Unsubscribe anytime.
Instructions
- Marinate with Intention:
- Whisk together the buttermilk, salt, pepper, garlic and onion powders in a large bowl until fully combined. Submerge your chicken tenders completely, cover, and let them soak up all that tangy goodness for at least an hour in the refrigerator.
- Prepare Your Dredging Station:
- Mix your flour with paprika, salt, pepper, cayenne, and that crucial baking powder in a shallow dish wide enough to fit a chicken tender. Having everything ready in a line makes the process so much smoother.
- Heat Your Oil Properly:
- Pour oil into your skillet or Dutch oven and heat it to exactly 350°F. If you dont have a thermometer, test with a pinch of flour which should sizzle immediately but not burn.
- Dredge with Care:
- Let excess marinade drip off each tender before pressing firmly into the flour mixture. Make sure every nook and cranny gets coated, creating those craggly bits that turn extra crispy.
- Fry in Batches:
- Gently lower a few tenders into the hot oil, giving them plenty of room to swim. Overcrowding causes the temperature to drop dramatically, giving you soggy coating instead of crispy perfection.
- Rest Before Serving:
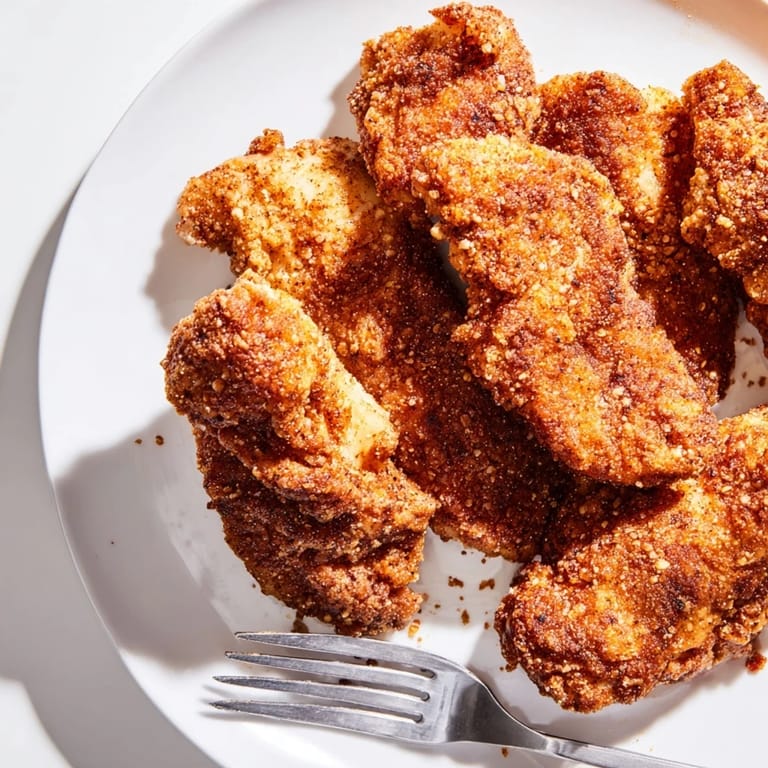
- After achieving that gorgeous golden-brown color (4-5 minutes per side), transfer to paper towels and let them rest for at least 2 minutes. This crucial step allows the crust to set up and the juices to redistribute inside.
 Save
Save I remember frying these tenders for my daughters birthday when she turned eight. She had requested real chicken tenders, not frozen ones, emphasizing the word real with all the seriousness a child could muster. After everyone had eaten, her best friend tugged on my sleeve and whispered, My mom says she needs this recipe because these are better than the restaurant. In that moment, these humble tenders became more than just dinner they were a small triumph in my journey as the parent who could make ordinary food extraordinary for the people I love most.
Troubleshooting Your Chicken Tenders
Sometimes the coating falls off during frying, which used to drive me crazy until I discovered two critical fixes. First, make sure your chicken is well-drained from the marinade before dredging. Second, once youve coated the chicken, let it rest on a rack for about five minutes before frying this gives the flour mixture time to adhere properly to the surface of the meat. When I started implementing these steps, my coating stayed intact beautifully, creating that perfect seal that keeps moisture in and oil out.
Serving Suggestions
These tenders shine brightest when paired with dipping sauces that complement their savory profile. I learned the hard way that store-bought options often cant compare to quick homemade ones. A simple mix of mayo, dijon mustard, honey and a dash of hot sauce takes just 30 seconds to stir together but elevates these tenders to new heights. For a complete meal, I like to serve them alongside a vinegar-based coleslaw the acidity cuts through the richness of the fried coating, creating that perfect balance that keeps your palate interested bite after bite.
Storage and Reheating
The first time I made these in bulk and stored leftovers in the refrigerator, I was devastated by how soggy they became overnight. After some experimentation, I found that reheating them on a wire rack in a 375°F oven for about 10 minutes brings back almost all of their original crispness without drying out the meat. The microwave is absolutely the enemy of crispy chicken the concentrated moisture turns your once-perfect crust into a sad, soft disappointment.
- Store leftovers in an airtight container with paper towels both under and over the tenders to absorb excess moisture.
- If freezing, place tenders on a baking sheet until frozen solid, then transfer to a freezer bag with parchment between layers to prevent sticking.
- When reheating from frozen, add about 5-7 extra minutes in the oven, but still use that wire rack for 360-degree air circulation.
 Save
Save These crispy chicken tenders have seen us through busy weeknights, celebrations, and those moments when comfort food was exactly what we needed. With each batch I fry, Im reminded that sometimes the simplest foods create the strongest connections around our table.
Recipe Q&A
- → How long should I marinate the chicken tenders?
Marinate for at least 1 hour in the refrigerator. For deeper flavor penetration, marinate overnight. The buttermilk tenderizes the meat while infusing it with tangy, savory notes.
- → What's the ideal oil temperature for frying?
Heat oil to 175°C (350°F). This temperature ensures the coating becomes golden and crispy while allowing the chicken to cook through without burning. Use a cooking thermometer for accuracy.
- → Can I make these ahead of time?
Yes. Marinate the chicken up to 24 hours ahead. Fry fresh before serving for best crispness. You can prepare the flour coating mixture in advance and store it in an airtight container.
- → Why double-dip the chicken?
Double-dipping—buttermilk, then flour, then buttermilk again, then flour—creates an extra-thick, crispier crust. This technique adds texture and helps the coating adhere better during frying.
- → What's the best way to keep them crispy?
Transfer fried tenders to a paper towel-lined plate immediately after cooking. Avoid stacking them while hot. For longer storage, place on a wire rack over a baking sheet in a 93°C (200°F) oven.
- → How do I know when the chicken is fully cooked?
Fry for 4–5 minutes per side until the coating is golden brown. Verify doneness by checking the internal temperature reaches 75°C (165°F) using a meat thermometer inserted into the thickest part.