 Save
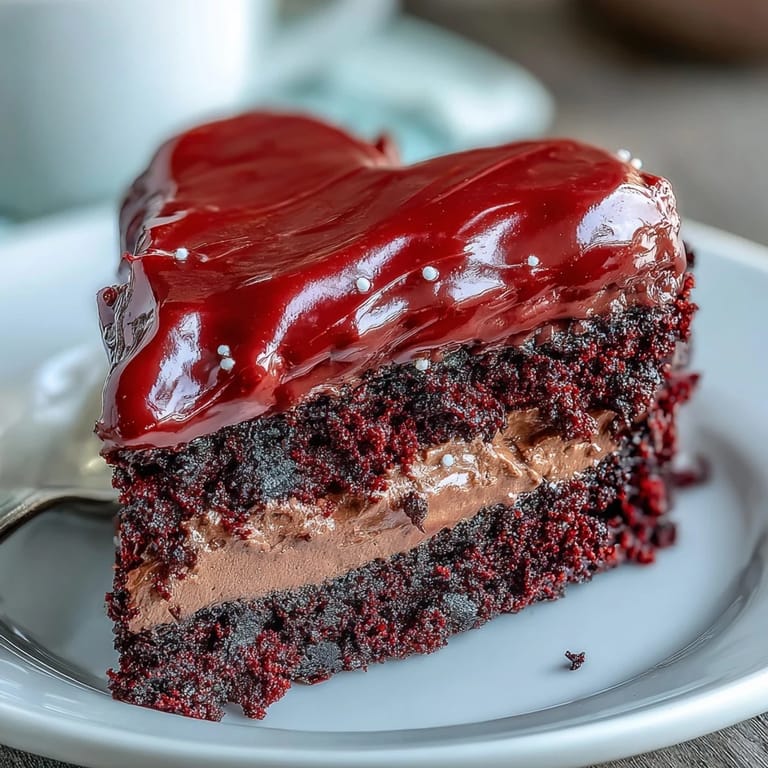
Save My kitchen counter looked like a crime scene of red food coloring the first time I attempted this cake. I was twenty minutes from showing up to my best friend's birthday party, fingers stained like I'd been painting, heart pans still warm from the oven. The Betty Boop silhouette had cracked during transfer twice already. But when that first slice revealed the perfect red crumb against the dark chocolate outline, I knew every frantic moment was worth it. Now I make this cake whenever I need something that feels both nostalgic and wildly fun.
Last Valentine's Day, I made this for my grandmother who grew up watching Betty Boop cartoons in the 1930s. She laughed so hard she cried, then proceeded to tell everyone at dinner about how she and her sisters used to sneak into the theater to see the films. The cake sat on her sideboard for three days and every time someone walked past, they'd stop and smile at that mischievous chocolate face. Food connects us to memories we didn't even know we were keeping.
Ingredients
- Cake flour: Lower protein content than all purpose flour creates that delicate velvet texture that practically melts on your tongue
- Natural cocoa powder: Just enough to give depth without turning the cake brown the red stays vibrant
- Buttermilk: The acidity activates the baking soda and creates an incredibly tender crumb structure
- Red gel coloring: Gel is concentrated so you get that saturated red without adding enough liquid to throw off the recipe ratios
- Room temperature ingredients: Cold butter and eggs won't emulsify properly leading to dense uneven cakes
- Double vinegar trick: White vinegar in the batter plus the baking soda vinegar combination creates extra lift for a lighter texture
- Cream cheese frosting: Must be full fat and properly softened or you'll end up with lumpy frosting that tears the cake surface
- Dark chocolate or candy melts: Dark chocolate cuts through the sweet frosting while candy melts are easier to work with for intricate designs
Tired of Takeout? 🥡
Get 10 meals you can make faster than delivery arrives. Seriously.
One email. No spam. Unsubscribe anytime.
Instructions
- Prep your pans and oven:
- Rub softened butter all over those heart shaped pans getting into every corner then cut parchment to fit the bottoms perfectly. Preheating to 350°F gives the cakes immediate lift so they don't spread sideways before setting.
- Whisk the dry ingredients:
- Sift the cake flour cocoa powder baking powder baking soda and salt together in a medium bowl. Sifting aerates the flour and prevents any lumps of cocoa from streaking through your red batter.
- Cream the butter and sugar:
- Beat the butter alone for a full minute until it looks like mayonnaise then gradually add sugar while the mixer runs. Let it go for another three minutes on medium speed the mixture should pale in color and feel silky when you rub it between your fingers.
- Add the eggs:
- Drop in the eggs one at a time running the mixer on low between each addition. Stop to scrape down the sides and bottom of the bowl at least twice so everything incorporates evenly.
- Color the batter:
- Pour in the red gel coloring vanilla and vinegar then mix until the batter is an even shocking red. Let it go a shade darker than you think you want since it bakes slightly lighter.
- Alternate wet and dry:
- With the mixer on low add one third of the flour mixture then half the buttermilk then repeat ending with the final third of dry ingredients. Stop mixing the second you see the last streaks of flour disappear.
- Activate with vinegar:
- Mix that one teaspoon of vinegar with baking soda in a small cup it will foam up immediately then fold it gently into the batter. Watch how the batter seems to grow before your eyes that's the chemistry working.
- Bake the cakes:
- Divide batter between your prepared pans using a kitchen scale for perfectly even layers then smooth the tops. Bake for 25 to 30 minutes rotating the pans halfway through until a toothpick comes out clean.
- Cool completely:
- Let the cakes rest in their pans for exactly ten minutes then run a thin knife around the edges and invert onto wire racks. Walk away and let them cool completely room temperature is ideal before frosting.
- Make the frosting:
- Beat the softened cream cheese and butter together for two full minutes until no lumps remain then gradually add powdered sugar with the mixer on low. Add vanilla and a pinch of salt then beat until fluffy and spreadable.
- Assemble the cake:
- Level any domes with a serrated knife then place one layer on your serving plate and spread about three quarters cup of frosting. Top with the second layer press gently then refrigerate for fifteen minutes to lock everything in place.
- Apply the crumb coat:
- Spread a very thin layer of frosting over the entire cake catching all those loose crumbs then chill for ten minutes. Add your final layer of frosting using an offset spatula to create swoops or keep it glassy smooth.
- Create the silhouette:
- Lay your Betty Boop stencil under parchment paper then trace the outline with melted dark chocolate using a small piping tip or toothpick. Let it set completely at room temperature or speed it up in the fridge for ten minutes.
- Final decoration:
- Peel the chocolate silhouette carefully from the parchment and position it on the center of the cake pressing gently so it adheres. Add any finishing touches like frosting rosettes or red sugar pearls around the edges.
 Save
Save My niece now requests this cake for every birthday and has started collecting heart shaped pans in different sizes. Watching her carefully pipe chocolate outlines with more patience than I had at her age reminds me how recipes become bridges between generations. Sometimes I think Betty Boop would be delighted to know she's still causing happy chaos in kitchens almost a century later.
Getting That Vibrant Red
After testing seven different brands of red coloring I learned that the trick is adding it with the wet ingredients before the flour goes in. The fat in the butter and eggs carries the pigment more effectively than water based liquids ever could. One batch I made was barely pink because I added the coloring last lesson learned.
Frosting Like a Pro
Run your offset spatula under hot water wipe it completely dry then smooth the frosting in long confident strokes. The heat slightly melts the surface giving it that professional sheen without any fancy tools. Repeat as needed warming the spatula each time for perfectly glassy sides.
Silhouette Success Secrets
Print your Betty Boop template in the exact size you want then trace it onto parchment with a food safe marker before piping chocolate over the lines. The marker stays on the parchment side so it never touches your food and you get a perfect outline every single time.
- Mix a tiny bit of vegetable oil into melted chocolate to make it more flexible and less prone to cracking
- Work in a cool room because chocolate softens quickly from warm hands and humidity
- Make two or three extra silhouettes since you'll likely break at least one during transfer
 Save
Save Every time I serve this cake someone asks for the recipe which is exactly the kind of cooking legacy I want to build. May your kitchen be messy your heart cakes be tall and your Betty Boop silhouette crack on the first try.
Recipe Q&A
- → What makes the red color so vibrant?
Gel-based food coloring provides the most intense red hue without thinning the batter. Liquid coloring can alter the consistency, while gel delivers concentrated pigment for that signature velvet shade.
- → Can I make the chocolate silhouette ahead of time?
Absolutely. Pipe your dark chocolate designs onto parchment and store them flat in an airtight container. They'll keep for several weeks at room temperature, ready to place whenever you assemble.
- → Why use both vinegars in the batter?
White vinegar in the wet ingredients enhances red color development, while vinegar mixed with baking soda creates immediate carbonation. This reaction produces an exceptionally light, tender crumb structure.
- → How do I prevent layers from sliding during assembly?
Refrigerate for 15 minutes after applying the filling layer. This brief chill sets the frosting enough to hold layers securely while you add the crumb coat and final decoration.
- → Can I use regular cocoa instead of natural?
Natural unsweetened cocoa works best here. Dutch-processed cocoa has a higher pH that can react differently with the baking soda and vinegar, potentially affecting both color and rise.
- → What's the purpose of the crumb coat?
A thin initial layer seals loose crumbs, creating a clean foundation. Brief chilling sets this coat so your final frosting layer remains smooth and free of stray crumbs.